SuperVidel
Videl replacement graphics card for the CT60
Updated March 4th 2012

With the CT60 the Falcon has become the fastest Atari available, at least when it comes to computation speed. One area where it still lacks greatly is Graphics. The SuperVidel project tries to remedy this.
Background
Just think about it; the falcon already has good sound abilities, which it has always had, and the CT60 brings it up to a good speed level. The most limiting factor for graphics intensive applications now will be writing to the STRAM to update the screen. If you do some calculations on the available bandwidth of the STRAM, a refresh rate of about 30fps is all that even the CT60 will be able to achieve. These calculations are made from assumptions of a 320x240x16bit screen, an available memory bandwidth of 5.5MB/s for the STRAM, and that the CPU performs updates of the whole screen continously from FastRAM to STRAM.
This is where our project comes in. We're designing a Videl-replacement graphics card, which will connect to the CT60 bus slot. The card aims to be 100% compatible with the old Videl chip at the register level.
Features as of 2012-03-04
(features marked in italics are planned to be released after the boards are shipped, with various degrees of likelihood)
- The SuperVidel is a CT60 expansion board, sitting on the internal CT60 expansion connector. The board colour will be orange.
- Xilinx Spartan-3 2000 FPGA in a FG456 package holds the logic for the whole graphics board functionality.
- Onboard 128MB 32bit wide DDR2 memory at up to 200MHz (DDR400), yielding a theoretical bandwidth of 1600MB/s. A resolution of 1600x1200@60Hz 24bit RGBA (4-byte) requires 460MB/s, so there should be plenty of bandwidth left for play. 220MHz has been tested when the FPGA contents were much less complete than currently, but this shows that there should be some overclocking potential left.
- DVI-I connector: support for both digital and analog output using a splitter cable (you get this cable yourself, costs around $10 on Ebay). This means the SuperVidel supports output to two screens at the same time.
- We investigated the possibility to move the DVI-I connector to a small board to be mounted at the back of the falcon case. We abandoned this idea to save time, cost and reduce risk. We have verified that the splitter cable mentioned in the last paragraph works fine. We're looking at the possibility to make a flexible DVI-I male to DVI-I female board to replace the DVI-I splitter cable in the future, since such cables are quite large and sturdy, so they may be difficult to fit between the SV and the floppy. But that is only in the planning stage.
- Features all the colour depths and resolutions of the old Videl chip, from mono to 16-bit, by functioning as the old Videl on the hardware register level. Currently all VGA resolutions INCLUDING 2-bit and ST modes work.
- No RGB modes have been tested. You will need to build a VGA-15-pin-to-RGB-connector converter to connect an RGB monitor. The SuperVidel has everything hardware wise to support RGB timing resolutions, but the needed VHDL code hasn't been written yet. Assume that you will need to run the SuperVidel only on VGA and DVI monitors to begin with, until the RGB is implemented.
- Adds a 24-bit (16,777,216 colors) color depth as a 4 byte RGBA mode.
- Adds an 8-bit chunky mode. Even a control bit for 8 bit chunky in the old videl register 0xFF82xx is added.
- Ability to generate a resolution of up to 1600x1200 at 60Hz (162MHz), or 1920x1080 at 60Hz (reduced timings, DVI only), even in the 24-bit color depth. Depending on flat screen monitor compatibility, for even higher resolutions we recommend halving the pixel clock rate, so you get 30Hz updates, which should be fine for desktop use on flat screens.
- Pixel clock supports the old 25.175MHz (VGA) and 32MHz (RGB) settings. The onboard clock chip supports up to 240MHz output, but the DVI standard for one channel limits us to 165MHz. This is enough for 1920x1080@60Hz (maybe 1920x1200) on DVI using "compressed" signal timings. VGA needs a much higher clock when doing such high resolutions. Around 200MHz is needed for 1920x1200, which makes it necessary to block the clock output to the DVI chip while running such high resolutions on VGA. This is a software issue, and may be solved later.
- When running Videl resolutions on the SuperVidel (like games and demos), the SV's 25.175MHz or 32MHz clock will slowly drift away from the corresponding clock of the Videl, so over time double buffered applications will start flickering. To fix this we need to get the original 25.175MHz and 32MHz clocks of the Videl into the SuperVidel. This requires soldering a total of 4 wires on the motherboard, but the other end of these wires is easily connected to the SV through a connector. The necessary flat cable is supplied with the SV.
- Dual screen output at up to 1920x1080, one screen on VGA and one on DVI. Recommended only up to 8bit mode right now. We don't have a dual channel DVI output, so we can't do dual DVI screens.
Since the board has only one clock signal from the clock chip to the FPGA we can only use the same resolution on the same pixel clock on both VGA and DVI. The SV now has separate VGA and DVI clock signals, so independent resolutions is possible. Desktop support for this is a software issue though, and may be included later.
- An integrated Super Blitter, not compatible with the old Blitter, because it was rarely used on the falcon anyway. The blitter can currently do normal 2D blits and also alpha in the 24-bit RGBA mode. Scaling blits are planned.
- Update of the whole FPGA contents from a program running under 060 mode. No cables of any kind are needed. You just download the new firmware from our homepage, load it with the update program and when it is finished you just turn off your falcon and then on again to activate the new firmware. If something goes wrong you need a Xilinx Platform USB cable though.
- Ethernet low-cost daughter board, called SVEthLANa (SuperVidel Ethernet LAN adapter), which connects to the SV using a small flat cable. The SVEthLANa is then screwed to the back of the Falcon case so you don't need to route an ethernet cable inside the falcon case, which takes up a lot of space. For those who have no EtherNat or do have one but can live without the USB support, the SVEthLANa should come in handy. This board is finished and will be produced at the same time as the SV itself, to reduce cost.
- MPEG2-support. A sensible limitation would be 720x288 interlace 50Hz PAL or whatever standard DVD resolution is. This is probably realised with one or two CPU cores in the FPGA with logic block support for inverse DCT and sub pixel blitting. Exactly how this will be implemented will most likely change before it is done. :)
- Hardware 3D support in the form of a polygon texture mapper. This requires lots of space in the FPGA though.
-
If you have a 2.5" internal harddrive mounted in the "standard" bracket on your motherboard you will not be able to keep it that way, because the DVI connector of the SuperVidel will need that space. You will have to move the harddisk somewhere else, or at least remove the space-consuming bracket. The harddrive can be put flat on the motherboard where it will not interfere with the DVI cable connected to the SuperVidel.
SVEthLANa ethernet board
Here are a few photos of the early but well functioning prototype of the SVEthLANa. Its measures are 70x28mm. The final board is slightly longer, and it will be orange like the SuperVidel. :)
SVEthLANa pic #1
SVEthLANa pic #2
Prototype boards
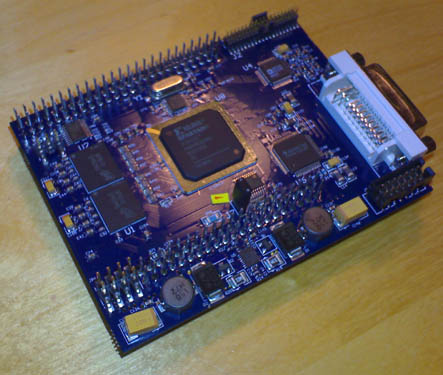
Here is another picture of our prototype boards taken just after we got them in january 2009.
FAQ
We have got some questions over the years, which we'll answer here:
- How much will the SuperVidel cost?
The final price of the SV is 248 Euro without VAT, and 310 Euro with Swedish VAT (for EU customers).
- Will the SuperVidel fit in the original Falcon030 case, and with other expansion boards like the EtherNat?
There are mainly two situations to consider when answering that question:
-
A standard case, with a standard CT60/63: Only one board fits below the keyboard, since the upward address connector barely touches the keyboard. Look at this picture:

Here you see a photo taken from the left of the falcon below the keyboard. The EtherNat is the only board mounted here, not the SuperVidel, but it will be the same situation. The keyboard rests on the address connector that you see pointing upwards in the middle of the picture. We had to remove a screw on the bottom of the keyboard since it bent some of the pins on the EtherNat. You should do this on your keyboard too if this case applies to you. Also do it if you just have an EtherNat...
-
A standard case, with a CT60/63 that has been moved backwards by using our version of Rodolphe's CT-extender:

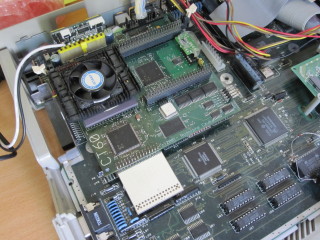
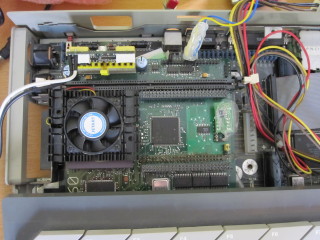
Notice the silvery extender board in front of the CT60, which moves the CT60 a few centimeters back. There is another one (not visible) below the CT60 for the other motherboard connector. The benefit of using the extender boards is that all boards that are stacked on the CT60 expansion port are out of the way of the keyboard:

Note though that only two boards fit vertically (SV + EtherNat, we can't know the height of other boards of course), since the ceiling of the plastic case is in the way. The extender boards have been soldered to the bottom of the CT60 by first removing the old CT60 female hole mount headers, and then inserting the extender male headers from below and soldering them in place. This is necessary to only lift the CT60 about 2mm above its original height. If we had kept the original female CT60 headers, the whole CT60 would have been raised about 10 mm and it would have hit the ceiling of the falcon case with its SDRAM DIMM. We will of produce the extender boards with the SuperVidel, but we won't be able to help anyone with the soldering work of attaching the extender boards to the CT60. Anyone who has basic soldering skills can do it, but it takes an hour or so.

